Der Riese
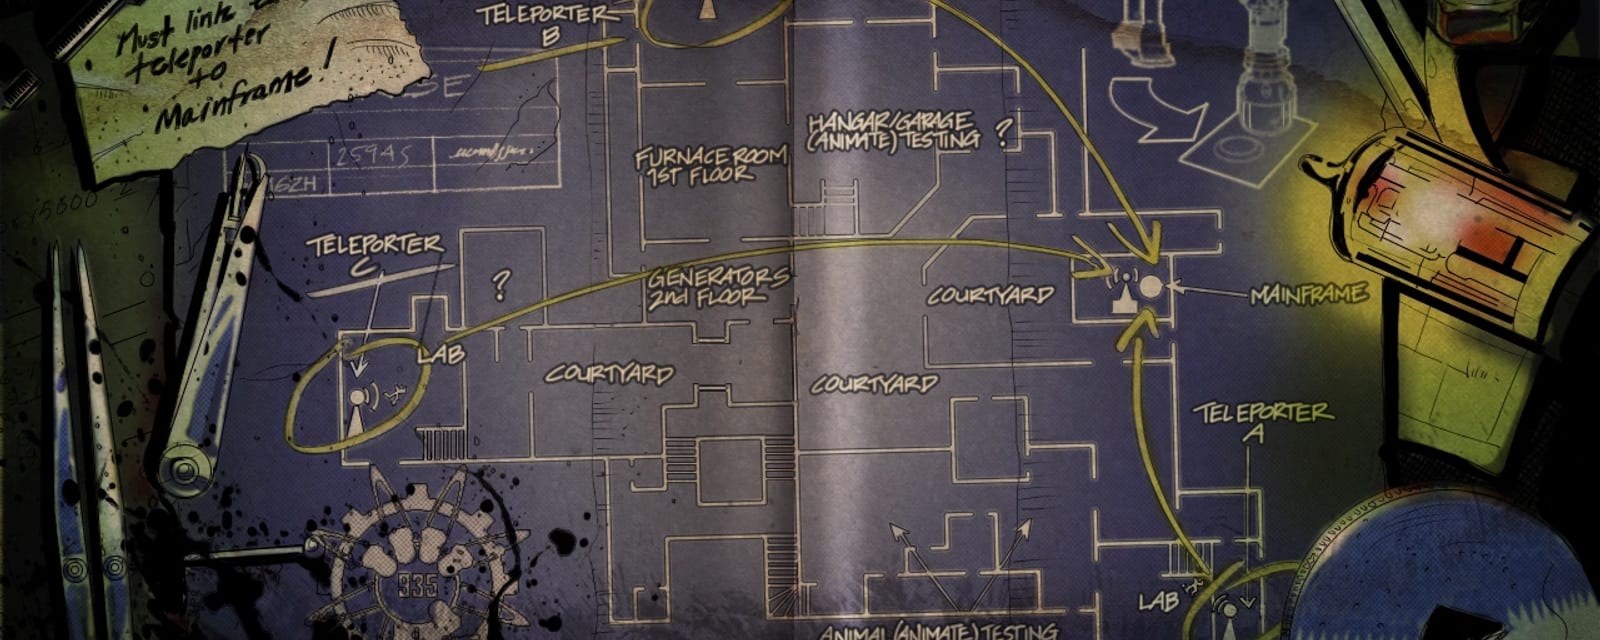
Group 935's factory — “The Giant” — and the map that set the template for everything after. Pack-a-Punch debuts here, unlocked by linking three teleporters to the spawn mainframe. The Fly Trap is the series' first real side Easter egg, the Bowie Knife and Monkey Bombs arrive, and “Beauty of Annihilation” plays from three specimen jars.
Quick answers
How do you complete the Der Riese Easter egg?
- Open to the rear courtyard and throw the power switch by the generator
- Buy Jugger-Nog, then link Teleporters A, B and C to the spawn mainframe one at a time (~30s each)
- With all three linked, Pack-a-Punch opens in spawn (5,000 per upgrade)
- Fly Trap: PaP a bullet gun, shoot the distant red panel from the animal-lab alley, then shoot the three hidden toys
- Sing “Beauty of Annihilation” at the three green specimen jars; collect the seven lore radios
What are the main areas on Der Riese?
How many side Easter eggs are on Der Riese?
When was Der Riese released?
Map & Key areas
The map layout first, then the areas worth knowing by name. Map imagery © Activision, self-hosted.
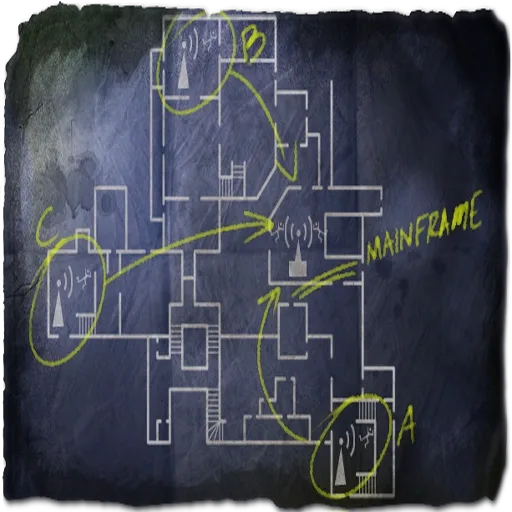
Spawn / Mainframe
Holds the mainframe pad and the sealed Pack-a-Punch. Link all three teleporters here to open it.
Animal Testing Labs (Teleporter A)
The lab wing beyond the Trench Gun and cages — Teleporter A, two of the song jars, and the Fly Trap cage teddy. The Fly Trap panel is sighted from the alley here.
Furnace room (Teleporter B)
The cremation building — Teleporter B, the Fly Trap furnace monkey, and the Thompson wall-buy (Mule Kick nearby in the Black Ops version).
Power courtyard & Teleporter C
The rear courtyard power switch, the bridge/Jug side, and Teleporter C behind the initial Box-side factory route.
What to do
- Open to the rear courtyard and throw the power switch by the generator
- Buy Jugger-Nog, then link Teleporters A, B and C to the spawn mainframe one at a time (~30s each)
- With all three linked, Pack-a-Punch opens in spawn (5,000 per upgrade)
- Fly Trap: PaP a bullet gun, shoot the distant red panel from the animal-lab alley, then shoot the three hidden toys
- Sing “Beauty of Annihilation” at the three green specimen jars; collect the seven lore radios
Before you start
What to have in hand before step 1 — from the loadout notes, from the walkthrough itself, and from the map's own quest documentation where the gate is never stated in a step.
- Pack-a-Punch debuts here (5,000 per upgrade) — unlocked only after power is on and all three teleporters are linked to the spawn mainframe.
- No Black Ops 3/Zombies Chronicles version exists under this name — the BO3 remake with the Annihilator and free-perk laser chain is a separate map, The Giant. Versions in scope here: the WaW original and Black Ops 1 (Rezurrection).
- Power first (rear-courtyard switch), then Jugger-Nog before pushing deep into the factory.
- The Bowie Knife (3,000, wall) and Monkey Bombs (Box) both debut on this map.
- The Fly Trap is the series' first side Easter egg; in the 2008 original it pays out an achievement and a Samantha line only, no item.
- The catwalk near Teleporter B is the go-to high-round hold; a Teleporter C balcony hold is also documented as an alternative.
Full walkthrough
The quest in the order this guide runs it — tap any step to jump to it, and it fills in as you tick steps off.
Power on
Turn on power first. It enables the teleporters, the mainframe link and the Electric traps — nothing else here works until it is on.
Confirmation cue: Teleporter pads become interactive.
Link the three teleporters
Hold Use on a pad to open a roughly 30-second link window (countdown top-left), then sprint to the mainframe and interact before it expires. A missed timer just needs re-activation — completed links stay completed. Order does not matter; the mainframe door lowers with each link, showing progress. Once linked, each teleport costs 1,500 a hop, occasionally spawns a free power-up, and kills any zombie in the pad; past round 25 it can spawn Hellhounds instead.
Quick win: A linked teleporter is also a fast, ammo-free escape from a bad train.
Pack-a-Punch opens
After the third link the mainframe door is fully open and the Pack-a-Punch shutters at spawn open with it — 5,000 points per upgrade for the rest of the match.
Confirmation cue: The shutters at spawn visibly open.
Bowie Knife, Monkey Bombs and the perk-machine quirk
Both debut here. The Bowie Knife one-hit kills through round 10 — strong early points. A thrown Monkey Bomb gathers the horde onto itself for a few seconds before detonating — use one for a clean revive or an uninterrupted Box run.
Quick win: Go prone in front of any perk machine for a small one-off points bonus (roughly 25, WaW's rounding) — once per machine, per match, free.
Fly Trap (the first side Easter egg)
Pack-a-Punch a reliable bullet weapon first — rifle, SMG, LMG, pistol or shotgun, not a wonder weapon. Shoot the small red control panel on the far pillar once; this unlocks Elevate Your Senses and Samantha announces hide-and-seek. Damage three hidden objects in any order (bullet, melee or grenade all count): a teddy bear high above the M1A1 Carbine wall-buy; a Monkey Bomb toy in the Thompson-room furnace; a second teddy bear (with a Juggernog bottle and an upgraded M1911) in the lower cage by the Trench Gun wall-buy.
Quick win: An awkward toy can be finished with a grenade if you are out of ammo — only the first, distant panel needs the Pack-a-Punched gun.
Confirmation cue: Samantha says Yay, you found one!, then Wow, you found another one!, then a loud You win... GAME OVER! after the third.
Version: The 2008 original ends here with dialogue and the achievement only — no item, no Annihilator. The Annihilator and free-perk laser chain belong to The Giant (BO3), a separate map.
Beauty of Annihilation
Hold Use on each glowing jar in any order: on top of a shelf and just behind it on a cupboard in Animal Testing, and on a desk in the Teleporter B side room. The song (Kevin Sherwood ft. Elena Siegman) plays once all three register.
Tip: There is no interaction sound at the jar itself — the track starting is your only confirmation, so don't assume a silent jar failed.
Story archive: four radios, three phonographs
Radio 1 (Teleporter C passage, behind the Box): Maxis's funding request. Radio 2 (spawn, by a stairs barrel): a failed zombie-command attempt. Radio 3 (across from the Trench Gun, above a door): Maxis and Samantha on Fluffy. Radio 4 (Teleporter B room, near the tank/ladder): Porter's final message. Phonograph 1 (Teleporter C shelf, behind the initial Box): test 3 fails. Phonograph 2 (cabinet above the main furnace): test 5. Phonograph 3 (empty furnace beneath Teleporter A): test 6, Fluffy, and the Maxis/Samantha betrayal.
Quick win: Free lore — the phonographs tell their story in order regardless of which you play first.
Version: A fifth radio some sites list is unused mobile content, not actually in the game.
Screaming Monkey, the hidden note, and map atmosphere
Throw a live Monkey Bomb into the open furnace behind the Thompson room — it screams as it burns and Samantha scolds you for cruelty to Mister Monkey. By the Thompson wall-buy, interact closely with a smaller, discoloured brick; it sinks to reveal a hidden message (a scoped weapon helps read it).
Quick win: Both are free and safe to check while passing through — no detour needed.
Electric traps and the courtyard chokepoint
Pay 1,000 to activate; it needs a cooldown before firing again. One detail worth knowing: you cannot walk through the live trap yourself without Jugger-Nog.
Tip: Save the Wunderwaffe or a Pack-a-Punched gun for stair collapses — treat the trap as a scheduled reset, not a constant crutch.
Hold-and-train plan for high rounds
A dedicated catwalk guide (guidexon.com) favours the back of the catwalk near the STG room, forcing nearly every zombie to approach from one direction. Loadout: a Pack-a-Punched Wunderwaffe DG-2 plus an upgraded HK21 or RPK (the guide prefers the HK21's larger post-upgrade reserve), with Mule Kick for a third weapon on BO1. Keep Jugger-Nog, Speed Cola, Double Tap and Mule Kick running, stack Bouncing Betties near the Box as a backstop, and save Monkey Bombs for crises. If overrun, drop off the catwalk and train the open area below until it is safe to return.
Tip: callofdutymaps.com instead names the Teleporter C balcony, on the same zombies-come-from-one-direction logic — either is defensible.
Version: The Mule Kick third weapon is a BO1-only addition — the WaW original caps you at two guns.
Side Easter Eggs & extras
Everything beyond the main quest. Tap any entry to open the full how-and-where breakdown.
Teleporter link → Pack-a-Punch
The first Pack-a-Punch. After power, activate each teleporter at its pad (a ~30-second link window opens) and run to the spawn mainframe to complete it before the timer expires. Do all three, in any order — then the PaP shutters open for the rest of the match. Full steps below.
- Turn on power at the rear-courtyard switch by the big generator — that enables the teleporters and the mainframe.
- Enter one teleporter room and hold Use on its pad — it opens a ~30-second link window (a countdown clock appears at the top-left of the screen) and tells you to link it to the mainframe.
- Sprint to the spawn mainframe pad and interact before the clock runs out; a beam and a completed indicator confirm that teleporter. Watch the mainframe door — it lowers a little with each completed link, so you can read your progress at a glance. If the timer expires, just re-activate that pad — completed links stay completed.
- Repeat for the other two (Teleporter A = Animal Labs side, B = furnace side, C = behind the initial Box route) — order doesn't matter.
- After the third link the mainframe door is fully open and the Pack-a-Punch shutters at spawn open with it; PaP stays usable at 5,000 per upgrade for the rest of the match. A linked teleporter also gives a point-cost trip to spawn and may drop a power-up.
Fly Trap (the first side Easter egg)
Pack-a-Punch a bullet weapon, shoot the distant red control panel from the M1A1 Carbine alley to wake the trap (this unlocks the Elevate Your Senses achievement), then shoot the three hidden toys for Samantha's completion line. In the 2008 original there's no item reward — the achievement and story dialogue are the payoff, and there is no Annihilator. Full steps below.
- Pack-a-Punch a reliable bullet weapon — a precise upgraded rifle, SMG, LMG, pistol or shotgun, not a wonder weapon or explosive.
- Go to the M1A1 Carbine side alley (the right-hand route from the mainframe toward the animal-testing side) and face through the barrier toward the distant factory.
- Shoot the small red control panel on the far pillar once with the PaP'd gun (single shots; aim at the panel, not the pillar). Objects glow green and rise, Samantha announces hide-and-seek, and the Elevate Your Senses achievement unlocks. Don't shoot the toys before this.
- Object 1 — teddy bear: high in the broken window above the M1A1 Carbine wall-buy, over the courtyard. Back into the courtyard and shoot it up high.
- Object 2 — Monkey Bomb (holding a stick grenade and a Molotov): inside the large open furnace in the Thompson/furnace room on the Teleporter B side; look into the furnace mouth and hit it.
- Object 3 — teddy bear holding a Juggernog bottle and an upgraded M1911: in the lower cage beside the M1897 Trench Gun wall-buy in the animal-testing area; aim through the bars.
- Damage the three in any order — a bullet, a melee hit or a grenade all count, so a toy in an awkward spot can be finished with a grenade if you're out of ammo (only the distant panel needs the Pack-a-Punched gun). Wait for Samantha after each; after the third she concedes and screams — the chain is complete. The lasting reward is the achievement (earned at activation) and the story dialogue; there is no Annihilator or item in the 2008 version.
Bowie Knife & Monkey Bombs
Both debut on Der Riese: the Bowie Knife (a one-hit melee wall-buy, huge for early points) and Monkey Bombs from the Mystery Box (throw one to gather the horde for a revive or a Box run).
“Beauty of Annihilation”
Kevin Sherwood ft. Elena Siegman. Interact with three green specimen jars (brain/spine) — two in the Animal Labs, one on the Teleporter B approach. Full steps below.
- Hold Use on 3 glowing green brain/spine jars, in any order
- Animal Testing Lab — on top of a shelf
- Animal Testing Lab — just behind the first, on a cupboard
- Teleporter Z-B room — through the boiler/vat room into the side room, on a desk
- 'Beauty of Annihilation' (Giant remix) by Kevin Sherwood & Elena Siegman plays — once per game
Story archive — 4 radios + 3 phonographs
Seven accessible World at War recordings tell the Group 935 story — four handheld radios and three phonograph logs (the phonographs play an ordered experiment narrative whatever order you use them in). No reward; a fifth radio listed online is mobile/unused content and is excluded. Full locations below.
- Radio 1 — underground passage off Teleporter C, behind the Mystery Box: Maxis's funding request (DG-2 progress and the Element 115 shortage).
- Radio 2 — spawn, beside a barrel on the right of the descending stairs: a failed attempt to command a zombie test subject.
- Radio 3 — across from the Trench Gun, above a door to the right of a Mystery Box position: Maxis discussing Fluffy and her puppies with Samantha.
- Radio 4 — Teleporter B room, low near the left tank/ladder: Porter's final message during the outbreak.
- Phonograph 1 — shelf near the stairs in the Teleporter C room, behind the initial Mystery Box: matter-transference test 3 fails.
- Phonograph 2 — tilted filing cabinet in the room above the main furnace: test 5 makes the dog disappear.
- Phonograph 3 — empty furnace beneath Teleporter A: test 6, Fluffy, the Samantha/Maxis betrayal and Richtofen's trap.
- Some units respond better to a shot than a press. Hold one zombie and let each finish — independent lore, not needed for the Fly Trap or Pack-a-Punch; there's no in-game counter, so track them yourself.
Electric traps & the catwalk hold
Electric-trap switches (1,000, ~30s) are your infinite damage; the catwalk by Teleporter B is a strong team hold with the window and stairs covered. Save the Wunderwaffe or PaP'd gun for stair collapses.
Screaming Monkey furnace
Once you have Monkey Bombs from the Box, throw a live one into the large open furnace behind the Thompson room — it screams as it burns and Samantha scolds you for being cruel to “Mister Monkey.” A small comedic secret.
Hidden note behind the Thompson bricks
By the Thompson wall-buy, inspect the pile of bricks for a smaller discoloured brick — aim closely and interact, and it sinks to reveal a hidden written message (a scoped weapon makes the small writing easier to read).
Loose change under perk machines
Go prone directly in front of a perk machine for a small one-time points bonus (around 25, give or take World at War's point rounding) — once per machine, per match. A quirky original-WaW freebie.
Not in the original
Mule Kick (Thompson/furnace side) and the Thundergun in the Box are Black Ops additions. The Annihilator, the snowfly trap and the laser free-perk chain are The Giant / Black Ops 3 — the original Fly Trap gives no item, only Samantha's final line.
Loading-screen cameo (BO1)
Der Riese's menu art appears in the BO1 Kino der Toten loading-screen comic strip.
Ambience worth noticing
The J.D. initials, a notice board hinting at Call of the Dead, Ascension and Paris (Moon's codename), an H. Yena Lab note, Samantha crying, nursery-rhyme singing, Griffin Station's lights on the moon, and an L. Maxis M.D. sign — all set dressing, all free to find.
Recommended loadouts
Three strong picks for this map — the map's Wonder Weapon plus reliable box/wall options. These are pre-augment-era games, so the setup is the gun plus Pack-a-Punch and perk synergy.
Wunderwaffe DG-2 → PaP
Chain lightningDer Riese's Box wonder weapon — and here you CAN Pack-a-Punch it (link the teleporters first) for more ammo and reach. Your best crowd answer.
Ray Gun → Porter's X2
Box splash + PaPPull from the Box and Pack-a-Punch for more damage and ammo. Run Double Tap and Speed Cola; mind the self-splash.
PaP'd bullet weapon (MP40 / BAR / Kar98k)
Fly Trap + backboneKeep one Pack-a-Punched conventional gun — it's what the Fly Trap panel shot needs, and a PaP'd MP40 or BAR carries normal rounds well.
Common Der Riese questions
Direct answers to the specific things players look up mid-game — part locations, puzzle steps and more.
How do I open Pack-a-Punch on Der Riese?
How do I start the Fly Trap?
What do I actually get for finishing the Fly Trap?
Where are the three specimen jars for the song?
What happens if I put a Monkey Bomb in the furnace?
Is there a hidden note on Der Riese?
What is the loose change under the perk machines?
How many story recordings are on Der Riese?
Which weapons debut on Der Riese?
Visual guides & sources
Screenshots and exact part locations live in these — open one on a second screen.
Map discussion
A shared community board for Der Riese — posts are public, saved on the server and visible to everyone across devices. Handy for strategies, spawn variations you've noticed, or steps to double-check. Please keep it civil and on-topic.