
Astra Malorum
An observatory on a floating skull in orbit, with a teleporter to a Martian temple. Outwit the unkillable sentinel O.S.C.A.R., free the second Shadowsmith, and beat the four-phase Caltheris.
Quick answers
Astra Malorum is a Black Ops 7 Zombies map set on an observatory orbiting a floating skull, with a teleporter to a Martian temple. Its 10-step main quest has you outwit the unkillable sentinel O.S.C.A.R., build the LGM-1 Wonder Weapon, and defeat the four-phase boss Caltheris. Expect 50–85 minutes; rated Hard and solo-capable.
Where is Pack-a-Punch on Astra Malorum?
What is the Wonder Weapon on Astra Malorum?
Who is the boss of Astra Malorum?
How do you kill O.S.C.A.R. on Astra Malorum?
How many steps is the Astra Malorum main quest?
How do you complete the Astra Malorum Easter egg?
- Install both Harmonic Oculus parts → defence → Pack-a-Punch
- Collect the 3 LGM-1 parts and 3 Absolute Zero shards
- Kill Oscar three different ways: sunbeam, laser trap, rocket
- Follow a patrolling Oscar for the Elimination 20 monologue → planet code
- Cryo key → bone saw → extract the brain → 60-second lockdown
- Read Mars' DEC coordinates → note Thurston's reading list
- Rotate each library bust by its book count → take Neptune
- Find the 3 planet notes → aim the chandelier planets → teleport to Mars
How long does the Astra Malorum Easter egg take?
Can you do the Astra Malorum Easter egg solo?
What are the main areas on Astra Malorum?
How many side Easter eggs are on Astra Malorum?
Are there solvers for the Astra Malorum puzzles?
When was Astra Malorum released?
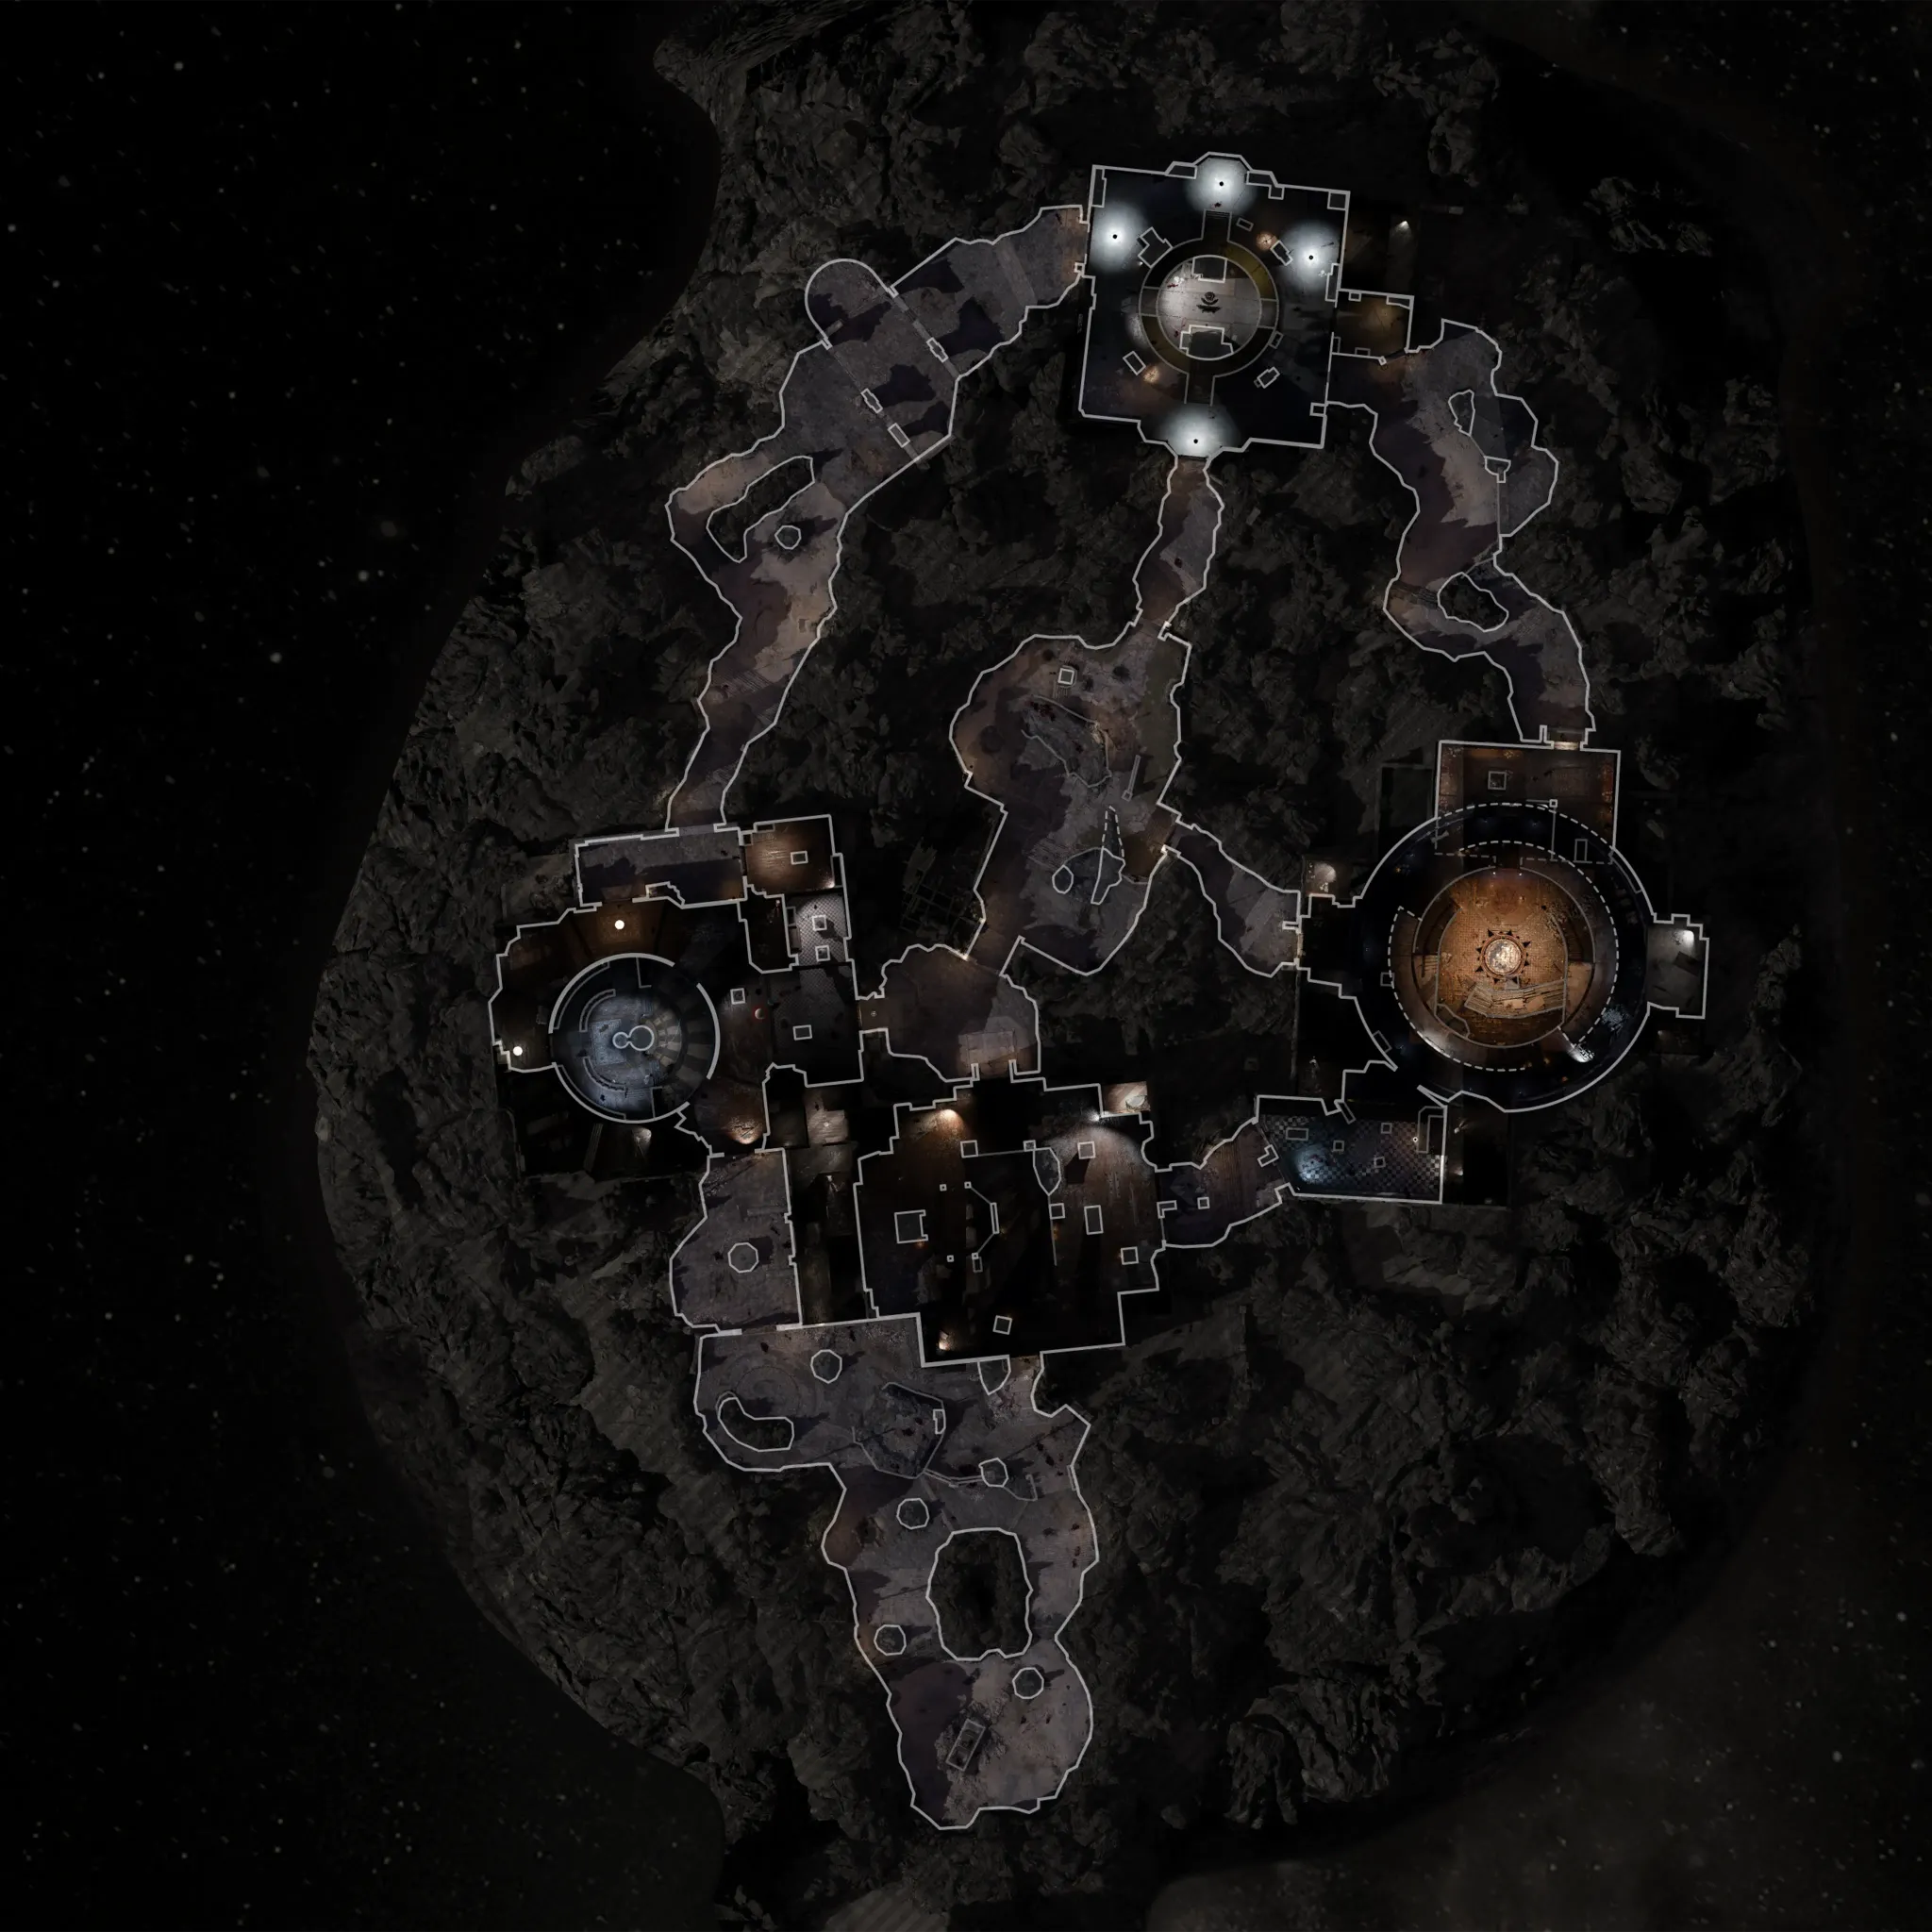
Map & Key areas
The map layout first, then the areas worth knowing by name. Map imagery © Activision, self-hosted.
 Crash Site
 Ammo Cache
 Wall Buy (Jäger 45)
 Quick Revive
 GobbleGum Machine
 Mystery BoxThe Luminarium
 Jugger-NogAmmo Cache
 ArsenalWall Buy (M34 Novaline)
 Stellar Dissector TrapMystery BoxMuseum InfinitumWall Buy (Carbon 57)
 Speed ColaAmmo Cache
 Crafting Table
 ExfilMystery BoxStargazer's CourtyardAmmo CacheExfilApogee Annihilator Trap
 Armor VestWall Buy (XM325)Mystery BoxGobbleGum MachineMachina AstralisAmmo CacheArsenalAmmo CacheArmor VestWall Buy (Akita)
 Stamin-UpMystery BoxAmmo CacheWall Buy (Shadow SK)Mystery Box
 Wisp TeaArmor VestCrafting TableAmmo Cache
 Mule KickExfilObservatory Dome
 Pack-A-PunchWall Buy (X9 Maverick)
 Fast TravelAmmo Cache
Tap a category to show or hide it. Pinch or double-tap to zoom in — marker positions come from the official Call of Duty map data.
Observatory Dome
The Harmonic Oculus (organ) & telescope; Pack-a-Punch.
Luminarium / Machina Astralis
Harmonic Components; the cryopod & code machine.
Museum Infinitium
Speed Cola; the bonesaw and the rocket trap.
Archive of Orbis
Three statues & the book puzzle.
Mars
Teleporter arena — pillars, the Ascendant Eye, and the boss.
Steps at a glance
- Install both Harmonic Oculus parts → defence → Pack-a-Punch
- Collect the 3 LGM-1 parts and 3 Absolute Zero shards
- Kill Oscar three different ways: sunbeam, laser trap, rocket
- Follow a patrolling Oscar for the Elimination 20 monologue → planet code
- Cryo key → bone saw → extract the brain → 60-second lockdown
- Read Mars' DEC coordinates → note Thurston's reading list
- Rotate each library bust by its book count → take Neptune
- Find the 3 planet notes → aim the chandelier planets → teleport to Mars
- Shoot the 5 pylons in order and catch the bird → Ascendant Eye
- Note the organ's 5 symbols including the static → activate the pillars
- Boss: charge the pylons to fire the brain laser, then strip armour
- Phase 4 — never path through the purple electricity pools
Before you start
What to have in hand before step 1 — from the loadout notes, from the walkthrough itself, and from the map's own quest documentation where the gate is never stated in a step.
- Aether Shroud Field Upgrade — Setup & safety
Set aside 50–85 min · 1–4 (solo-capable) · the full loadout is further down this page
Where your run will differ
Gathered here so you meet them before they cost you a run rather than after — quoted word for word from the guide below, or researched from the map's own quest documentation.
What changes with your player count. The rest of the guide is the same either way.
- “In co-op one player can pull the horde away entirely.” step 5
- “His attack is tracking lasers on every player — keep moving, and in co-op everyone must run the same direction so you do not cross each other’s trails.” step 10
- “In co-op, group in the middle and chain Group Shroud, refreshing with Power Keg or Raindrops…” step 10
Full walkthrough
The quest in the order this guide runs it — tap any step to jump to it, and it fills in as you tick steps off.
Power the map and raise Pack-a-Punch
Open toward the Observatory Dome and interact with the Harmonic Oculus to turn the power on. You are then prompted to find two missing components: a scroll piece beside a dead zombie in Machina Astralis, and a second part beside a dead zombie in the Luminarium.
Install both at the Dome and hold a short defence while the Pack-a-Punch machine arrives.
Note on Cursed mode: Standard shows the steps on screen; Cursed gives you no guidance at all, so know the route before you attempt it there.
Loadout: the DS20 Mirage, Novaline or a kitted AR all work, with an Ion sniper as a secondary specifically to strip boss armour. Take Shatterblast for the boss and Deadshot’s armour-damage minor augment. There are no Max Ammo drops in the boss fight — only an ammo crate and one scripted power-up — so carry 15,000 to 20,000 points in for rebuys.
Quick win: Three free Mystery Perks are waiting as soon as Pack-a-Punch is on. Museum Infinitum: wall-jump the west-wall pillar for the vinyl disc, play it on the gramophone by the Carbon 57 wall-buy and feed it melee kills. The Luminarium: disc on the dark shelves opposite Juggernog (east wall), gramophone between the two couches (north-west) — it wants Field Upgrade kills, so a damaging one like Dark Flare, not Frenzied Guard. Machina Astralis: disc in the wooden box in the north-east corner by the tarp-covered cabinet, gramophone on the table opposite Stamin-Up in the Archive of Orbis — equipment kills, and it hands you lethals to use.
Quick win: Two statues on the way: Bonus Points high on the south wall by the spawn teleporter, Max Ammo on the ledge behind the left arch as you enter the Luminarium from the Crash Site — C4 the Max Ammo for later.
Gather the LGM-1 parts
Three build parts plus three shards. The UFO part requires Oscar — the robot mini-boss who spawns after power around round 7 or 8, emerging from the steam vents with a siren at the round start. He patrols like a sentry until aggroed.
Do not kill Oscar yet — you need him alive for the three trap kills, and you want the UFO shot off him first.
Quick win: Intel on the route: Fools sits on the south-wall shelf of the Luminarium trap room, Planets on the north-west shelf of the Observatory, and in the Luminarium shoot the ceiling planets Mercury, Venus, Earth, Mars, Jupiter, Saturn, Uranus, Neptune — Pluto falls and smashes into the Immense Power document. The drone you shoot off O.S.C.A.R. is the Damaged Drone artifact — pick it up.
Cursed only — Do not kill the first O.S.C.A.R. that spawns if you want the Spider Fang relic — his health is fixed at the round he appeared, which is what makes the round-40 melee kill possible.
- Damaged UFO disc — shoot the small UFO flying around Oscar while he patrols
- Aberrant wires — find the one blinking lamppost among the dozen-plus around the map (it may look knocked over, or sit next to Wisp Tea) and shoot it a couple of times
- Old Tessie car battery — with a Pack-a-Punched weapon, shoot the front bonnet of Tessie in spawn. It pops open with the battery, and a zombie ambush spawns as you take it
- Three Absolute Zero shards — put Cryofreeze on a weapon at an arsenal machine, shoot the three purple aether crystals around the map, and collect each shard (tracked in the HUD)
Kill Oscar three different ways
One Oscar per trap, in any order — a fresh one spawns every couple of rounds. Whichever trap kill is your third pops out the LGM-1.
Sunbeam trap (PaP room): interact with the organ to play its tones, then shoot the six or seven steaming vents in sequence as the steam jumps between them — corners, pillars, and up on the balcony above Pack-a-Punch. It is on a timer; fail and you replay the organ to restart. Success gives a quote and the telescope moves. Interact with the viewfinder and drag the cursor onto the sun — Mars is the decoy. With Oscar in the room, exiting the viewfinder fires a laser through the telescope; walk him through it. Shooting his orbiting UFOs staggers him in the beam.
Laser trap (Luminarium): install the UFO disc, wires and battery into the trap to the right of the switch, lure Oscar in and activate it — the first use is free. A charging bar runs while the trap damages him; stay in the room and destroy the mini-UFOs that spawn around him until it completes.
Rocket trap (Museum Infinitum): with the three Absolute Zero shards, destroy Oscar’s UFOs, then interact with the back of the rocket to load the shards. A five-or-six-second countdown runs — keep Oscar standing in the exhaust at zero and he freezes.
The other guide: MrDalekJD counts only five steaming boxes in the sunbeam sequence.
Quick win: A fourth free perk — the five skulls. Shoot each with a Pack-a-Punched gun and collect it when the eyes turn purple: Museum display case (facing west), Luminarium floor by the crumbled red-brick wall (south-west), Stargazer's Courtyard in the floor hole left of the ammo crate, Machina Astralis north-wall open cabinet opposite the Arsenal, the Veilwalk red-brick wall (facing north). Place them on the north-east desk in Machina Astralis in slot order 4, 3, 2, 1, 5; they spin one at a time — shoot them back in that order and they merge into a Random Perk power-up. The spin order is random per match.
Elimination 20 and the planet code
Wait for a fresh Oscar that is patrolling — yellow searchlight, not aggroed — and follow behind him with subtitles on while he plays back elimination recordings.
Listen for this exactly: at the playback of Elimination 20 he quotes Dr Fen and then names three planets. Note them in order — that is your code.
Convert them to each planet’s order from the sun, Mercury being 1 through Neptune at 8. Neptune, Mars, Jupiter would give 845. Enter it on the machine in the Observatory Dome.
Confirmation cue: the screen shakes with a character quote and a platform facing Pack-a-Punch lowers. Mantle up and take the cryo key beside the body.
Quick win: While you trail him: Robotics is in the north-east cabinets of the Machina Astralis box floor, Dual Functions in the Veilwalk gazebo (west wall), Eventful pops out when you shoot the paper stack on the Archive of Orbis table, and Their Town hangs off the Abyssal Rim cliff between Wisp Tea and the ammo crate — crouch to grab it.
Planet Code Calculator
Observatory Dome keypadThurston's recording names three planets. Pick them in the order spoken — each converts to its order from the Sun (Mercury 1 … Neptune 8) and the code updates live (each number is 2 digits, dash-separated).
O.S.C.A.R. Audio-Log Stopwatch
Elimination Twenty challengeThe trailing audio log plays for roughly 90–120 seconds. Start this when it begins so you know when to expect it to finish.
Extract the brain
Smash the glass cabinet in the Museum and take the bone saw. Then go to the cryopod room on the south side of Machina Astralis, open the chamber with the key, and hold interact to use the saw and remove the brain.
Oscar teleports in and attacks during the extraction — do not start it with him already breathing down your neck.
Place the brain in the jar in the Luminarium, then interact again to start a 60-second lockdown defending it from every side, Oscar included, with purple-eyed zombies streaming in. In co-op one player can pull the horde away entirely.
Confirmation cue: white flash — pick the jar up and carry it to the perfusion machine in Machina Astralis, the solar-system room, and hold interact to connect it.
Quick win: The Perfusion Machine you pick up after the lockdown is itself an intel artifact — the pick-up counts, no extra step.
Coordinates, reading list and busts
Mars coordinates. At the Observatory viewfinder, centre the cursor on Mars — its position randomises. The bottom-left box shows a four-digit DEC value. If it reads as three digits, such as 57° 5', the number is 5705 — the zero is added. Enter it at the opened box one floor up in Machina Astralis for “coordinates accepted”.
Reading list. The screen left of the brain machine flashes book titles, three to six of them, randomised per game. Note the full list.
The busts. In the Archive of Orbit, three statue busts are each tied to a set of bookshelves, colour-coded by wall. Interacting with a shelf names its book. For each bust, count how many of your list’s books sit on its shelves, then rotate that bust exactly that many times.
Do the whole sequence fast. MrDalekJD reports needing it within about 15 seconds of a round starting, one attempt per round; MrRoflWaffles allows three mis-inputs before the busts lock until next round. Either way, work out your counts before you touch anything.
Confirmation cue: the hatch above the ladder opens. Climb up, take the Neptune planet and install it on the empty prong on the top floor of Machina Astralis.
Statue / Book Puzzle Solver
Archive of OrbisDr. Thurston's reading list flashes some book titles. Tick the ones that appeared — each book belongs to a fixed statue, so the solver counts them and tells you how many times to turn each statue. You have ~15 seconds to do all three, so use quick taps.
Mars Declination Code
Telescope → Machina AstralisPoint the telescope at Mars and read the DEC value bottom-left (degrees and arcminutes). Enter them to get the 4-digit code for the machine on the Machina Astralis west railing.
Align the planets and reach Mars
Find three notes, each pairing a planet with a compass direction. They sit on the table in Machina Astralis (Saturn), the table in the Archive of Orbit (Mars), and the table against the wall in the Luminarium laser-trap room (Neptune). The directions randomise per game.
In the solar-system room, the chandelier doubles as a compass with the directions marked. Shoot each hanging planet — Saturn is the big ringed one, Mars the medium red, Neptune the blue — until it points at its noted direction.
If a planet will not move, you are shooting the wrong one. Nudge with extra shots until it sits clean on the bearing.
Interact with the brain machine — the teleporter ring floats up and a lockdown begins. Expect roughly 90 seconds against an immune Oscar with infinite zombies, and UFO volleys fired at the central structure that you need to shoot down, each announced by a sound cue.
Confirmation cue: “the red planet is yours” — everyone teleports to Mars.
Planet Directions Summary
Mars — compass stepSet the compass direction shown for each planet in-game — they collect here so you can read all three at a glance instead of flicking between them.
Mars — catch the Ascendant Eye
Pick up the brain jar that falls as a canister on the lower level, carry it upstairs, place it on the machine and hold interact again to craft it in — a quote about a missing component plays first.
React immediately to the odd sound. After Thurston says “that’s odd”, run straight to the back window of Mars with a long-range weapon.
Shoot the metal pylons outside in order: back-right, back-left, front-right, front-left. Then turn 180° and shoot the pylon above the machine. A tiny flying bird zips between the pylons as each lights up, drawing it into the map.
Catching it: wait for low gravity, keep re-shooting the rear pylon so it does not fly off, and when it swoops low jump and hold interact mid-air — from Thurston’s top platform if you need the height. That gives you the Ascendant Eye.
Place the eye in the pyramid slot on the right side of Mars.
Quick win: Catching the Eye also banks the Ascendant Eye intel artifact.
Organ symbols and the five pillars
Back on Earth, interact with the organ in the Observatory. The display flashes five symbols — four visible plus one interference tone. Rewatch it as many times as you need, and record both the sequence and which position the static occupied.
On Mars, the LGM-1 holder shoots the antenna tops of all five pillars — one in a corner, two upstairs by the teleporter, two bottom-left. UFOs orbit the antenna, it spins, a tone plays, and all pillar bases then glow dull blue.
The trick: the pillar-base glyphs are stylised variants of the screen glyphs, and the static position is the pillar whose symbol never flashed — you identify it by elimination.
Timed from the first activation. A wrong pillar flashes red; three mis-taps and you wait for the next round.
Confirmation cue: a rising tone per pillar, then a white flash — the boss is available.
Mars Symbols Order Tracker
Observatory Oculus → Mars pillarsThe five symbols appear one way on the Observatory Oculus (the gold discs you tap here) and a different way on the Mars pillars (the line versions shown in the result). Read the order on the Oculus, tap the gold discs in that order, and the Mars-pillar sequence to activate builds live. One Oculus slot sits static/blank — the symbol you never tap is that missing one, done last by elimination.
Boss fight — Caltheris
Hold interact on the brain jar to vote in.
Phase 1 — energy form. Kill zombies anywhere in the arena to charge the pylon soul-boxes at the edges: right pylon first, then left, then both at once. When a pylon is lit blue, go upstairs and hold interact on the brain to fire a laser taking roughly a quarter of the boss’s health. His attack is tracking lasers on every player — keep moving, and in co-op everyone must run the same direction so you do not cross each other’s trails. The third sequence adds acid gas flooding the ground floor — stand upstairs or in the centre circle until it clears — plus lava patches.
Phase 2 — physical form. A bullet sponge. Strip the armour with the Ion sniper or Shatterblast to expose a glowing blue crit spot; hit markers turn yellow when you are on it. He throws rocks at a single player — break line of sight and the boulder shatters mid-air — and closes in to box you, so keep distance and keep circling.
Phase 3 — Ascendant. Same loop plus a ground slam: he stops moving and leans back as the tell, and you jump as it lands or it strips every armour plate. There is an armour wall at the top of the stairs selling a full set for 10,000.
Phase 4 — the Needle. The brain jar drops a 60-second power-up giving max ammo, a full field upgrade and effectively infinite equipment — save it and spam equipment while it runs. The rocks are now electrified and their impact points leave dark purple electricity pools that are near-guaranteed downs. Never path through them. In co-op, group in the middle and chain Group Shroud, refreshing with Power Keg or Raindrops, and unload on the crit spot.
Side Easter Eggs & extras
Everything beyond the main quest. Tap any entry to open the full how-and-where breakdown.
“Magic”
Avenged Sevenfold. 3 Mister Peeks headphones: display case in Machina Astralis, bottom shelf left of the Luminarium exit, and on Mars (left of the main structure).
- Interact with 3 Mister Peeks headphones, in any order
- Machina Astralis — inside a glass display case, between the ammo cache and the Arsenal
- The Luminarium — on the bottom shelf of the bookshelf by the door to the Observatory Dome (crouch to reach)
- Mars — along the southern wall; needs the main quest ~half done, then take the left-side stairs down
- 'Magic' by Avenged Sevenfold plays
“Pareidolia” (Shangri-La)
Wall-jump off the floating rock beside Wisp Tea to drift through space with the remixed Pareidolia playing (repeatable — and the first ride lets you grab Ol' Tessie's DG-2 turret). Stare at the giant Mars statue head for the original version.
- A nod to the theory that Shangri-La sits on Mars
- Original 'Pareidolia' — on Mars, aim at the giant head statue on the hill for a few seconds
- Remixed 'Pareidolia' — by Wisp Tea, throw an explosive at the big floating asteroid, then wall-jump onto the broken chunk to drift into space; the remix plays during the ride (and nets the DG-2 Turret the first time)
Skull memory game
Shoot 5 skulls around the map with a Pack-a-Punched weapon and collect them, place them on the Machina Astralis desk, then shoot them back in the order they float. Rewards a Random Perk power-up for the whole team.
- Pack-a-Punch any weapon first — skulls only activate to PaP'd shots
- Skull 1: Museum Infinitum — display case behind Speed Cola
- Skull 2: The Luminarium — floor by the crumbled red brick wall
- Skull 3: Stargazer's Courtyard — hole in the floor left of the Ammo Crate
- Skull 4: Machina Astralis — open cabinet on the north wall, opposite the Arsenal
- Skull 5: The Veilwalk — by the red brick wall near the Archive of Orbis door
- Shoot each until purple, pick up, place all on the Machina Astralis desk (red circles)
- Interact — they float one at a time; shoot them back in that order for a team-wide Random Perk
Gramophone music discs
Three music discs (e.g. the Museum Infinitum wall-jump pillar) each start a kill challenge at a gramophone; succeed for a free Mystery Perk each — fail and you get salvage instead.
- Each gramophone needs its vinyl disc first; playing it starts a song during which you get kills to drop a Mystery Perk
- Museum Infinitum: wall-jump to the disc on the west pillar, then play the gramophone by the Carbon 57 wall-buy and get melee kills
- The Luminarium: take the disc from the east-wall shelf, play the gramophone by the Energy Rock case and get kills
- Archive of Orbis: find the disc in the NE box by the clock, play the gramophone opposite Stamin-Up and get equipment kills (Semtex works)
Nikolai's Easter Egg
Throw Molotovs at 3 dirt piles in the Abyssal Rim, follow the fiery footprints to a toy goat and complete the quest for legendary-tier loot.
- Play as Nikolai and get three Molotovs (buyable ~350 salvage at a crafting table)
- By the Abyssal Rim ammo box, throw a Molotov on the dirt pile under the lamp post
- Follow the flaming footprints to the base of the stairs and throw the second Molotov
- Follow them up the stairs and throw the third — a cutscene plays with the toy goat
- Reward: an armour plate, a Molotov and an Akita shotgun
Ghost twins
On a Ravager round, interact with the twin display case in the Museum Infinitum to trigger the ghost twins encounter.
- On a Ravager round, interact with the twin display case right of the big window in the Museum Infinitum
- Then listen at the other display cases for one playing eerie sounds and interact with it
- Repeat the listen-and-interact step on the next two rounds (three total)
- The twins appear on the map — approach for a free Cryo Freeze ammo mod, then more loot each round after
Interactive solvers
Every solver for Astra Malorum, in the order you meet them. Each also appears inside its step in the walkthrough above — use whichever is handier. Browse every Zombies solver →
Planet Code Calculator
Observatory Dome keypadThurston's recording names three planets. Pick them in the order spoken — each converts to its order from the Sun (Mercury 1 … Neptune 8) and the code updates live (each number is 2 digits, dash-separated).
O.S.C.A.R. Audio-Log Stopwatch
Elimination Twenty challengeThe trailing audio log plays for roughly 90–120 seconds. Start this when it begins so you know when to expect it to finish.
Statue / Book Puzzle Solver
Archive of OrbisDr. Thurston's reading list flashes some book titles. Tick the ones that appeared — each book belongs to a fixed statue, so the solver counts them and tells you how many times to turn each statue. You have ~15 seconds to do all three, so use quick taps.
Mars Declination Code
Telescope → Machina AstralisPoint the telescope at Mars and read the DEC value bottom-left (degrees and arcminutes). Enter them to get the 4-digit code for the machine on the Machina Astralis west railing.
Planet Directions Summary
Mars — compass stepSet the compass direction shown for each planet in-game — they collect here so you can read all three at a glance instead of flicking between them.
Mars Symbols Order Tracker
Observatory Oculus → Mars pillarsThe five symbols appear one way on the Observatory Oculus (the gold discs you tap here) and a different way on the Mars pillars (the line versions shown in the result). Read the order on the Oculus, tap the gold discs in that order, and the Mars-pillar sequence to activate builds live. One Oculus slot sits static/blank — the symbol you never tap is that missing one, done last by elimination.
Recommended loadouts
Three strong picks for this map — the map's Wonder Weapon plus reliable box/wall options. Each weapon lists a full recommended attachment build and the perks to pair with it, every perk shown with its Major and Minor augment. Push weapons to Legendary rarity and Pack-a-Punch; augment/attachment metas shift with balance patches, so treat these as a strong current baseline.
Kogot-7 (Akimbo SMG)
Boss & O.S.C.A.R.+The Season-1 meta gun. Its DPS chews through O.S.C.A.R.'s huge health pool and melts Caltheris. PaP + Legendary with Deadshot, Double Tap and Death Perception.
Attachments
- OpticEAM Dyad xL
- MuzzleHawker Ported Comp
- Barrel10.2" TZ-Incisor Barrel
- MagazineVex Expanse Mag
- Fire ModsBuffer Spring
- Rear GripRhinebeck Grip
- StockMFS Kogot-7 Akimbo
- LaserConvergence Box Laser
Perks & augments
- Jugger-NogMajorTurtle Shell — back armour absorbs rear damageMinorDurable Plates — tougher armour
- Speed ColaMajorClassic Formula — even faster reloadsMinorQuick Swap — faster weapon swaps
- Deadshot DaiquiriMajorDead Head — bigger critical-damage bonusMinorDead Break — more damage to armour
- Double TapMajorDouble Dealer — every fourth bullet deals doubleMinorDouble Down — more penetration damage
- Stamin-UpMajorGuns Up — fire your weapon while sprintingMinorFootwork — faster non-forward sprint
- Death PerceptionMajorSixth Sense — see enemies behind, less rear damageMinorHidden Gems — see nearby loot through surfaces
XR3 Ion (Legendary · PaP III)
Burst damage+Elite-level burst that outperforms most rifles in the boss fight — the Vulcan Minigun conversion focuses O.S.C.A.R. and the phase weak-points. Recoil grip + fast handling. Both creators actually reach for the Novaline marksman rifle here — the budget bullet alternative to the Kogot-7 and XR3, and a better fit for Astra’s long sightlines.
Attachments
- MuzzleMFS 3x3 Compensator
- Barrel15" Fringe Barrel
- UnderbarrelXR-3 Ion Vulcan Minigun (conversion)
- Fire ModsAccelerated Recoil System
- Rear GripXR-Initialize Grip
- StockExposed-73 Stock
- LaserConvergence Box Laser
Perks & augments
- Jugger-NogMajorTurtle Shell — back armour absorbs rear damageMinorDurable Plates — tougher armour
- Speed ColaMajorClassic Formula — even faster reloadsMinorQuick Swap — faster weapon swaps
- Deadshot DaiquiriMajorDead Head — bigger critical-damage bonusMinorDead Break — more damage to armour
- Double TapMajorDouble Dealer — every fourth bullet deals doubleMinorDouble Down — more penetration damage
- Stamin-UpMajorGuns Up — fire your weapon while sprintingMinorFootwork — faster non-forward sprint
- Death PerceptionMajorSixth Sense — see enemies behind, less rear damageMinorHidden Gems — see nearby loot through surfaces
LGM-1 (Wonder Weapon)
Situational / adds+The quest weapon: fires UFO drones that zap zombies. Handy for crowd tagging, but its damage is modest — lean on the Kogot/XR3 for O.S.C.A.R. and the boss.
Attachments
- —Wonder Weapon — no Gunsmith attachments
Perks & augments
- Jugger-NogMajorTurtle Shell — back armour absorbs rear damageMinorDurable Plates — tougher armour
- Speed ColaMajorClassic Formula — even faster reloadsMinorQuick Swap — faster weapon swaps
- Stamin-UpMajorGuns Up — fire your weapon while sprintingMinorFootwork — faster non-forward sprint
- Double TapMajorDouble Dealer — every fourth bullet deals doubleMinorDouble Down — more penetration damage
- Elemental PopMajorRainbow Pop — triggers the enemy's weakness elementMinorVulnera Bean — more elemental-weakness damage
- Quick ReviveMajorEquivalent Exchange — kill enemies to self-revive (x3)MinorSlow Death — longer last-stand timer
Recommended kit & gum picks
The recommended kit for this quest. There are no Max Ammo drops in the Caltheris fight — only an ammo crate and one scripted power-up — so farm points first and carry 15,000 to 20,000 in for wall-armour rebuys. Armour destruction is the fight's core mechanic. Weapons are in Recommended loadouts above.

Aether Shroud
Afterimage decoy for the Oculus repair, the Mars portal and the Caltheris fight.

Frenzied Guard
Pull aggro and repair armour on kills for the lockdown and pillar steps.

Dead Wire
Chain lightning to stun and strip O.S.C.A.R. and the Mangler crowds.

Napalm Burst
Burning area damage for the packed observatory lanes.

Brain Rot
Turns a zombie into an ally to hold a lane during the book puzzle.

Shatter Blast
Armour destruction is the core mechanic of the Caltheris fight — MrRoflWaffles rates this over everything else for phases 2 to 4.

Molotov
A fire pool for chokepoints and the pillar holds.

Monkey Bomb
Distraction bait during the coordinate and Ascendant-Eye steps.

Perkaholic
UltraEvery perk at once.

Aftertaste
RareKeep your perks after a revive.

Armor Gettin'
LegendaryFull 3-plate armour vest with plates.

Free Fire
EpicNo ammo for 60s on Caltheris.

Dead Drop
EpicMore salvage and equipment for ~5 min.

Shields Up
RareRefills armour at 2× strength for 3 min — the gum both creators bring on every map, and blue rarity so you will actually have it.

Phoenix Up
LegendaryRevive with perks intact — MrDalekJD wants anything that keeps your perks through the Caltheris phases.
Perkaholic
UltraFull perks for whoever pops it.

Nowhere But There
EpicTeleport to a downed team-mate and revive nearby.
Aftertaste
RareKeep perks through a down during the boss.

Power Vacuum
EpicPower-ups spawn more often for ~5 min.
Free Fire
EpicNo ammo for 60s on the boss.
Per-map augments
The Major + Minor augment to run on each core perk for this quest. BO7 gives 4 Major and 4 Minor options per perk — a different set from BO6, so don't cross them. Picks are tuned to this map's boss and steps; augments unlock at Level 11 and metas shift with patches, so treat as a strong baseline. Per-map augment recs are ground no competitor covers.
 Reactive ArmorMinor
 Durable Plates
 Phantom ReloadMinor
 Quick Swap
 Dead AgainMinor
 Dead Break
 Guns UpMinor
 Hot Foot
 PhD SliderMinor
 Tribologist
 Dying WishMinor
 Slow Death
Calling cards on this map
Cosmetic calling cards you can earn on this map. ⏳ marks time-limited main-Easter-Egg cards — miss the window and they're gone for good. Global Dark Ops challenge cards are in the reference section below.

Main-quest completion card
Main EEComplete the Astra Malorum main quest.
Exact card name not yet confirmed.
⏳ Time-limited — only awarded if you finish before Directed Mode is added for this map; permanently missable afterwards.
GobbleGum reference — Black Ops 7
Black Ops 7's 52 GobbleGums: the 11 BO7-only gums (tagged New in BO7) plus all 41 that carry over from Black Ops 6. Spare gums crush for Essence. Filter by rarity.
Aftertaste
RareKeep your perks after being revived.

Turncoat
RareNearby zombies are charmed. (Season 2 Reloaded)

Kill Joy
RareDrops an Insta-Kill.

Cache Back
RareDrops a Max Ammo.

Temporal Gift
RareYour next timed power-up lasts longer.

Stock Option
RareAmmo drawn from your stockpile for 60s.

Anywhere But Here
RareRandom teleport plus a concussive blast.

Arsenal Accelerator
RareFaster Field-Upgrade charge for 5 min.
Shields Up
RareRefill armour at 2× strength for 3 min.

Power Keg
RareDrops a Full Power power-up. (Season 1)

Tactical Diffusion
RareNext Nuke is disabled and pays +2,000 Essence. (Season 3)

Requipment
EpicEquipment slots refill over time for 5 min.
Power Vacuum
EpicPower-ups spawn more often for 5 min.

Elemental Exposure
EpicWeapons always hit the elemental weakness for 3 min. (Season 1)

Respin Cycle
EpicRespin the Mystery Box to an equal or higher rarity.

Who's Keeping Score?
EpicDrops Double Points.
Free Fire
EpicNo ammo consumed for 60s.

Exit Strategy
EpicInstant exfil vote with fewer spawns.

Profit Sharing
EpicShare Essence with nearby players for 2 min.

Soda Fountain
EpicYour next perk buy grants +1 random perk.
Nowhere But There
EpicTeleport to a downed player and revive nearby.
Dead Drop
EpicIncreased salvage and equipment drops for 5 min. (Season 2)

Explosive Flourish
EpicEach reload triggers an explosion for 2 min. (Season 4)

Round Off
LegendaryThe round can't advance for 2 rounds.
Armor Gettin'
LegendaryA 3-plate armour vest plus full plates.

Hellping Hound
LegendarySummons a friendly Hellhound that follows and fights alongside you for 5 min; in Dead Ops Arcade it spawns three Hellhounds to fight for you for one round. (Season 4 Reloaded)

Idle Eyes
LegendaryZombies idle for 30s.

Wall Power
LegendaryYour next wall-buy comes Pack-a-Punched.

Immolation Liquidation
LegendaryDrops a Fire Sale.
Phoenix Up
LegendaryRevive all downed players, perks kept.

On the House
LegendaryDrops a Random Perk power-up.

Wall To Wall Clearance
LegendaryWall-buys cost 10 Essence for 30s.

Crate Power
LegendaryYour next box gun comes Pack-a-Punched.

Modified Chaos
LegendaryReduced Ammo-Mod cooldowns for 2 min. (Season 2)

Support Group
LegendaryGrants an ARC-XD, Mangler Cannon, Sentry and Mutant Injection. (Season 3)

Flavor Hex
LegendaryGrants a random Ultra gum. (Season 4)

Gift Card
Ultra+30,000 Essence.

Fully Packed
UltraInstantly upgrades your current weapon to Pack-a-Punch Level III. In Dead Ops Arcade it grants a tactical armour vest with full plates instead. (Season 5 Reloaded)
Perkaholic
UltraEvery perk on the map at once.

Wonderbar!
UltraYour next box spin is a Wonder Weapon.

Near Death Experience
UltraProximity revive with perks for 3 min.

Reign Drops
UltraDrops all core power-ups at once.

Hidden Power
UltraYour held weapon becomes Legendary rarity.

Time Out
UltraClear all enemies and end the round for 3 min. (Season 1)

Slaylist
WhimsicalPlays a random Zombies song. (Season 1)
Newtonian Negation · Indiegestion · Holiday Cheer · Quacknarok · Die Pitched · Rainburps · Jacked Lanterns
Whimsical7 cosmetic seasonal gums — flair only, no gameplay effect.
Field Upgrade reference (Black Ops 7)
Black Ops 7's 9 Field Upgrades — charged by kills, each augmentable at Level 11 (one Major + one Minor, plus an extra Minor slot). Six shipped at launch; Tesla Storm, Frost Blast and Mister Peeks returned in Season 1. The carried-over field upgrades reuse and extend Black Ops 6's augment options (see the BO6 reference above); BO7's full, distinct per-augment names aren't yet reliably published, so they're not itemised here rather than shown incomplete (honesty over guesswork — §11).

Energy Mine
A proximity energy explosion.

Frost Blast
A frost AoE that slows enemies.
Healing Aura
Instant heal beams (also revives teammates in BO6/BO7).
Aether Shroud
Phase out of enemy detection.

Tesla Storm
Lightning links players, stunning and damaging enemies.
Frenzied Guard
Repair armour and taunt enemies; kills repair your armour.

Toxic Growth
Thorn vines that slow and damage.
Dark Flare
A penetrating shadow beam.

Mister Peeks
Summons a decoy that attracts and attacks enemies. (BO7 new)
Dark Ops & mastery cards (Black Ops 7)
Global ‘Dark Ops’ challenge cards plus mastery/prestige — earnable on any map. Filter by category.

Another Round
Dark OpsReach Round 100.

The One
Dark OpsReach Round 999.

Anathema
Dark OpsEliminate 1,000,000 zombies.

Social Distancing
Dark OpsReach Round 20 without taking damage.
Invincible
Dark OpsSurvive to Round 50 without going down.
Armed to the Teeth
Dark OpsHold 3 Pack-a-Punch-III Legendary weapons with ammo mods and 8 perks.
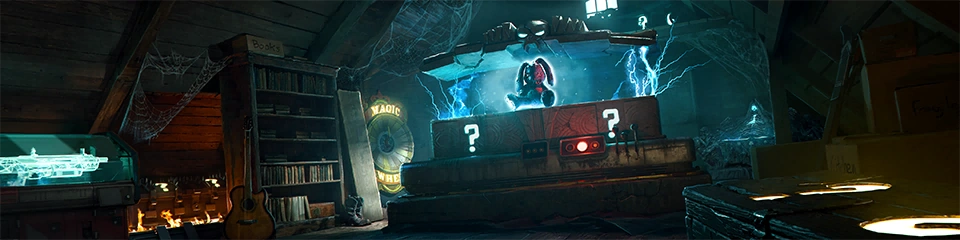
Box Addict
Dark OpsBuy 30 Mystery Box weapons in a single match.
Harbinger of Doom
Dark OpsKill 100 zombies with a single Scorestreak.

The Usual, Please
Dark OpsDrink Jugger-Nog 20 times in a single match.

New Main
Dark OpsKill 1,000 zombies with each of the 8 dedicated Crew Operators.
Action Hero
Dark OpsKill 100 zombies without reloading.

Martial Artist
Dark OpsReach Round 50 using only melee and Combat Axes.

Ready for Publishing
Dark OpsFully research all Augments.

Countdown
Dark OpsKill an Elite by launching it with a jump pad.

Ingenuity
Dark OpsReach Round 50 with the Dragon Wings + Lawyer's Pen relics active.

Zombies Dark Ops Master
MasteryComplete 15 Zombies Dark Ops challenges.

Force Multiplier / Dead Set
PrestigeReach Prestige (harder at higher prestiges).
Intel
11 pieces — 4 Audio Logs, 3 Documents, 4 Artifacts. Each piece is 1,000 XP; all 11 award 10,000 XP and the Astra Malorum Intel calling card.
Audio Logs 4
Fools (hint: “Please take your seat.”)
The Luminarium (Jugger-Nog / trap room) — on a shelf on the south wall.
Planets (hint: “Organ donor.”)
Observatory Dome — NW corner, on a shelf.
Robotics (hint: “Extraorbital.”)
Machina Astralis (Mystery Box floor) — cabinets on the NE wall of the circular room.
Dual Functions (hint: “Unsafe arbor.”)
The Veilwalk (Mule Kick) — inside the gazebo, facing the west wall.
Documents 3
Immense Power (hint: “Look out below!”)
The Luminarium — shoot the ceiling planets in order out from the Sun (Mercury, Venus, Earth, Mars, Jupiter, Saturn, Uranus, Neptune); Pluto then drops and smashes to give it.
Eventful (hint: “Archive stacks.”)
Archive of Orbis (Stamin-Up) — shoot the stack of papers on the central table.
Their Town (hint: “Poser planet.”)
Abyssal Rim (Wisp Tea) — between Wisp Tea and the ammo crate, look down off the west cliff toward Saturn and crouch-interact so you don't fall.
Artifacts 4
Damaged Drone (hint: “Progress through the main quest.”)
Shoot one of O.S.C.A.R.'s shield drones, then pick it up when it drops.
LGM-1 (hint: “Progress through the main quest.”)
Complete the LGM-1 wonder-weapon quest.
Perfusion Machine (hint: “Progress through the main quest.”)
After getting Dr. Thurston's Brain and clearing the Luminarium lockdown, pick up the Perfusion Machine holding the brain.
Ascendant Eye (hint: “Progress through the main quest.”)
On Mars — summon it via the off-map pylons, freeze it by shooting the orb above the temple, then use anti-gravity to jump and grab it.
Cursed Mode relics
Six relics on Astra Malorum — two Grim, two Sinister, two Wicked. Gong, Matryoshka Doll and Golden Spork went unfound for months and were all solved in the same week.
Cursed is Black Ops 7's hardest mode, and it needs no unlock — anyone can load it. It strips the run back: you start with a 1911 and no loadout weapon, there is no minimap, no objective markers and no quest progress bars, and every Pack-a-Punch tier costs double — 10,000, 25,000 and 50,000 Essence. Points work the Black Ops III way: melee kills pay more than shots, and any non-lethal hit pays 10.
Relics are not buffs. Every one is a pure downside. What you get back is the Cursed Tier they add up to. A Grim relic fills a third of a tier bar, a Sinister two thirds, a Wicked a whole one — so Tier I is three Grims, or one Sinister plus one Grim, or a single Wicked. Tier I puts Golden Armor on sale after Tier III armor, for 45,000 Essence. Tier II unlocks Ultra rarity — 8,000 Salvage on top of Legendary, or 17,500 from Common. Tier III unlocks Pack-a-Punch IV, for 100,000 Essence. You can equip as many relics as you like, but nothing improves past Tier III.
To earn a relic you finish a hidden side quest, which spawns a Relic Portal, then clear the Relic Trial behind it. Two things catch people out. Relic progress is not saved — the side quest and its trial have to be done in one sitting. And you can only equip a map's relics once you have finished that map's main quest. Inside a trial your own relics are switched off, so the trial's rule is the only thing working against you. Every first-time clear pays 1,000 XP and a GobbleGum.
On this map: Relic Trials here leave the whole map open to you.
Gong
What it costs you: Your Field Upgrade starts fully charged, and after that only a Full Power power-up will recharge it.
Before you start: Take any lethality augments off Tesla Storm and Dead Wire before the match — the Rod Zombie has to survive the proc. Lightning Strike is the safest Dead Wire augment. Use a Common or Uncommon weapon too, since ammo-mod damage scales with the rarity of the gun carrying it.
- 1Anywhere · round 20+
Wait for the Rod Zombie
From round 20 a zombie with a lightning rod stuck in it spawns every round. It does not despawn like ordinary zombies, so you can group the horde at one end of the map, run to the other, and let it walk to you on its own.
- 2Observatory Dome · Archive of Orbis · The Luminarium
Light the bulb over three doorways
The three doorways are by the Pack-a-Punch machine in the Observatory Dome, by Stamin-Up in the Archive of Orbis, and by Jugger-Nog in The Luminarium. Bring the Rod Zombie close to one, shoot it until Dead Wire procs — without killing it — then immediately trigger Tesla Storm and walk into it. The current jumps to the bulb above the door.
With the Bus relic equipped the Rod Zombie's health regenerates, so one zombie can serve all three doors in a single round.
PortalJust outside the Observatory Dome's door to the Stargazer's Courtyard, by the broken pillar on the north-east side.
Relic TrialOnly electric damage kills — keep Dead Wire on; the M34 Novaline is the obvious answer. The waves run zombies, Core Uber Klauses, zombies, then an HVT Uber Klaus (one report counts it as two waves).
Seed
What it costs you: The Mystery Box is disabled, leaving you on wall buys. Fire Sale power-ups and the Immolation Liquidation GobbleGum still bring a box.
- 1One of six floor spots
Find the Common-rarity pistol
Two in the Observatory Dome — along a wall, or under the Pack-a-Punch machine. Just outside the front or back entrance to Machina Astralis. In the hallway behind the Stellar Dissector. In the small room with the Mr. Peeks headphones in The Luminarium.
Watch out: a Ravager will eat the pistol if it finds it, and it does not respawn unless you save, quit and reload.
A Ravager can eat the pistol — save and quit to respawn it.
- 2Anywhere
Get exactly the round number in kills with it
Twenty kills on round 20, fifty on round 50 — exactly, then put it away. Easiest on the first Ravager round after you pick it up. You may Pack-a-Punch it and raise its rarity, and Insta-Kill counts. Ammo mods and Wisp Tea, PhD Flopper or Elemental Pop will not fail it, but they will scramble your count. Over- or undershoot and you can try again next round.
Track the kills on the scoreboard; a Kill Joy gum or the floating Scholar's Way skull makes it painless. Over- or under-count and you simply try again next round. Mister Peeks laughs, and the portal appears the round after.
PortalThe back of the Pack-a-Punch room, to the left of the Ammo Cache.
Relic TrialWaves one and three are zombies and Mimics, two and four are HVT Mimics — and all you have is a Tier 1 Pack-a-Punched pistol. Its Pack-a-Punch level is locked, but you can raise its rarity at an Arsenal. Traps and a Disciple Injection do the heavy lifting.
First clear pays1,000 XP and an Exit Strategy GobbleGum.
Spider Fang
What it costs you: Perk prices at machines never come back down, so replacing perks after a down gets steadily more expensive.
Before you start: The Mask of Benevolence augment stops the Wisp attacking O.S.C.A.R., which breaks this outright. Leave it off.
- 1Map-wide
Save the first O.S.C.A.R.
Leave the first O.S.C.A.R. of the game alive until round 40 — the ones that spawn later have far more health.
- 2Wherever he is
Melee-kill him while the Wisp is on him
Drink Wisp Tea and let the Wisp lock onto O.S.C.A.R. Bring his health down however you like, but the last hit has to be your knife, and the Wisp has to be attacking him as he dies.
Confirmation cue: Mister Peeks laughs.
Run default Wisp Tea with no major augment so the Wisp targets him but barely hurts him (the Extension and Haste minors help); pull the horde away with a Monkey Bomb or Kazimir, pop Aether Shroud and beat him down. If the Wisp lands the final blow, the step fails.
PortalThe west wall of the Archive of Orbis — the room the wiki calls the Library — directly across from Stamin-Up.
Relic TrialFive waves with no perks at all; everything else is available. Mimics come in with the zombies, O.S.C.A.R. keeps roaming, and Uber Klaus cores appear in the later waves. Wave two is an HVT Uber Klaus, wave five an HVT O.S.C.A.R. The Apogee Annihilator handles both. Stay mobile and lean on the Apogee Annihilator trap in Stargazer's Courtyard and a Pack-a-Punched Ray Gun.
First clear pays1,000 XP and a Wall To Wall Clearance GobbleGum.
Matryoshka Doll
What it costs you: Salvage drops are halved.
- 1Main quest
Open the way to Mars
Push the main quest as far as the portal to Mars, then pick up C4.
- 2Mars — the central platform
C4 the three chunks of meat
Three pieces of meat sit around the outer edge of the big circular platform. Stick C4 on each of them, then detonate into a crowd. The exact number of kills needed is not yet known publicly — wiping a large horde is normally enough.
Guides estimate 50 or more explosive kills — herd a big horde onto the platform before you detonate.
PortalMachina Astralis, by Thurston's cryopod. It is yellow.
Relic TrialFive waves of zombies and HVTs where enemies only die while your Field Upgrade is running — Frenzied Guard (fast recharge, more armour) or Aether Shroud with Frenzy Fire; pair either with the LGM-1. Shock Mimic HVTs, and an O.S.C.A.R. HVT on wave five.
First clear pays1,000 XP and a Phoenix Up GobbleGum.
Golden Spork
What it costs you: Enemies deal double damage.
- 1Mars
Fire the Mangler Cannon into the portal, then follow it
Put a Mangler Cannon shot through the portal back to Earth, then go straight through after it. Start this at the top of a round, or when you know plenty of zombies are left — the next step needs a crowd, fast.
- 2Machina Astralis — the red circle
Group a horde inside the ritual circle
You have 10–15 seconds. The red circle is painted on the ground between the teleporter and the Archive of Orbis. Stand in the middle of it and drop a Monkey Bomb or Decoy at your feet to pull the biggest crowd around you. Five to ten seconds later the Mangler shot comes back out of the teleporter and flies at wherever you are standing — it has to kill a large number of zombies inside the circle itself.
Decoys hold them there. Gamerant puts the bar at ten or more kills inside the circle.
PortalCrash Site, between Quick Revive and the GobbleGum machine. It is red.
Relic TrialSix waves of zombies and HVTs (one report says four) where enemies only take damage from hip fire; an HVT Uber Klaus and an HVT O.S.C.A.R. close it out. The Little Green Menace-1 is ideal — accuracy is irrelevant to it and it never runs dry.
First clear pays1,000 XP.
Civil Protector Head
What it costs you: Perk decay — you lose a perk every 100 kills.
- 1Crash Site
Read Ol' Tessie's lights
Detonate an Energy Mine in front of Ol' Tessie. Her headlights flash three times as a get-ready, then the individual head- and brake-lights flash in a sequence. Note the order. Miss it or forget it and she runs the whole thing again — the loop repeats indefinitely until you have the relic.
- 2Museum Infinitum
Translate the lights into chandeliers
The headlights are the two north chandeliers — one above the Crafting Table, one above the Ammo Cache. The brake lights are the two south chandeliers, to the right and left of the door you come in from the Crash Site.
Guides disagree on the mapping: the wiki says the headlights are the pair above the Crafting Table and Ammo Cache and the brake lights the pair either side of the Crash Site door; Gamerant says the headlights are the two nearest Stargazer's Courtyard and the brake lights the two nearest the Crash Site. Left light = left chandelier of its pair in both readings — check which pair the Crafting Table and Ammo Cache sit under in your game before you dive.
- 3Museum Infinitum
Blow out the candles in that order
Each chandelier has one lit candle. Dive to prone under each one with PhD Flopper, in the order the lights flashed; each dive blows a candle out. Get it wrong and they relight next round for another attempt.
Gamerant says the order re-rolls each round, so read the lights and dive in the same round.
PortalBehind the Mystery Box spawn at the Crash Site.
Relic TrialSix waves of zombies and HVTs — Uber Klaus and O.S.C.A.R. — and every zombie sprints at maximum speed.
First clear pays1,000 XP and a Reign Drops GobbleGum.
When it isn't working
The stalls that actually cost people runs on this map, and what to do about each.
Copied an answer from another guide and it did not work?
Common Astra Malorum questions
Direct answers to the specific things players look up mid-game — part locations, puzzle steps and more.
Where are the LGM-1 parts on Astra Malorum?
What is the planet code on Astra Malorum?
How do you solve the statue and book puzzle on Astra Malorum?
How do you catch the Ascendant Eye on Astra Malorum?
How do the five pillars work on Astra Malorum?
What is the Astra Malorum song?
What is the Mars declination code on Astra Malorum?
Visual guides & sources
Screenshots and exact part locations live in these — open one on a second screen.
Map discussion
A shared community board for Astra Malorum — posts are public, saved on the server and visible to everyone across devices. Handy for strategies, spawn variations you've noticed, or steps to double-check. Please keep it civil and on-topic.